This site is about drones and its components to be able to produce your own drone DIY and to shop online for all the parts needed to make your own flying drone with the smallest price
droneparts
HOW TO BUILD A DRONE | STEP BY STEP GUIDE
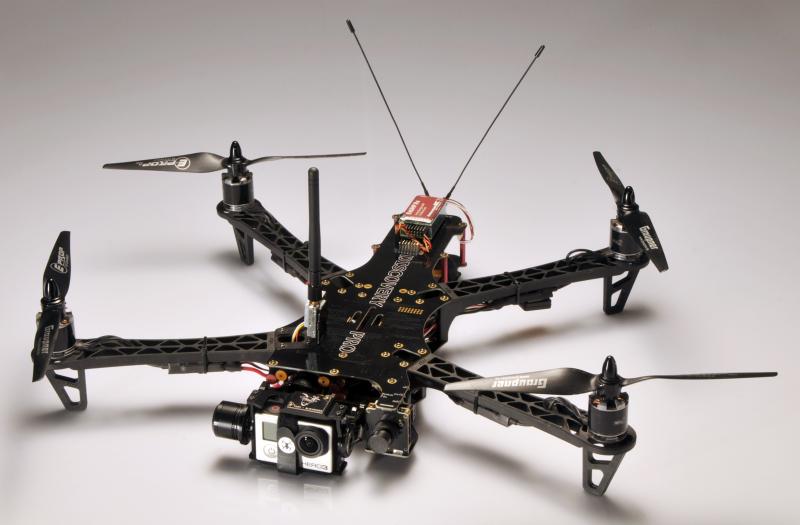
Getting Started with Multicopters
A multicopter is a flying robot
resembling a wagon wheel without the wheel. It has a central hub with
electronics, power, and sensors, onto which are mounted arms that hold
propellers to provide lift. The number of arms gives the name: a tricopter
(trirotor) has three arms, a quadrocopter or quadcopter (quadrotor) has four, a
hexacopter six, and an octocopter eight. There are other variations, but these
are the most popular setups.They're also called multirotors, which arguably is
the correct term, but I'll stick to multicopters because that's used more
often on the Internet, where you'll find the most information on the topic.
Why try multicopters? Perhaps you saw one and you just have to own this cool new
gadget. Or you fly R/C planes and you'd like to try a new type of aircraft. Or
you're into DIY electronics or robots, or you want to do aerial photography.
Whatever your motivation, there's an option for you. I've flown a variety of
multicopters and built three of my own, so I've picked up a few tips I can
share.
Homebrew Pedigree
In 2003, Hong
Kong-based company Silverlit Electronics read in the newspaper about students Daniel
Gurdan and Klaus M. Doth's prize-winning entry in
Germany's national Young Scientists
competition. Gurdan and Doth's design was of a radio-controlled, self-leveling
quadrocopter.
Gurdan and Doth
Tips on how to build, buy, fly, and spy with multirotor R/C helicopters.
In late
2004, Silverlit began production of their X-UFO, a simplified and cheaper
version of the students'design. When this product hit the international
markets over the next few years, it seeded the idea of a small, remote
controlled multicopter to many people throughout the world. Today there are
dozens on the market.
The Silverlit
X-UFO
How Drones Work
On an ordinary helicopter, the
tail rotor provides horizontal thrust to counteract the main rotor's torque,
in order to keep the helicopter from spinning around with the main blades.
How a regular helicopter
works
A multicopter works quite differently. Take for instance a quadrocopter: every
second propeller spins in the opposite direction (Figure 2-4), counteracting the torque of the adjacent
propellers.
Quadcopter propellers spin in opposite
directions
More importantly, a multicopter has an onboard
computer that varies the speed on individual propellers, making possible every
form of spin, tilt, yaw, and rudder control around any center and any axis, as
well as flight in any direction.
Your First Multicopter
The best starter
multicopter is lightweight: the lighter the copter, the less damage to it and to
the surroundings when you crash. And you will crash! The bigger they get, the
more scared you'll be of flying them. Large multicopters can rip through
clothes and flesh, and they cost a lot of money. The downside is that lighter
versions carry less payload (read: cameras and extra sensors), and flying time
is usually shorter. The upside is that they're cheaper. Ironically, it's
also a good thing that lighter copters are typically harder to control, due to
fewer sensors and less-sophisticated overall construction. Why is this good?
Because you'll learn to fly. A heavy, complex autonomous multicopter might be
easier to fly or even fly by itself but you'll never learn to handle a
multicopter that way. That can be a big problem the moment something goes wrong.
And something will go wrong.
Building Your Own Multicopter
Once you've played with multicopters,
you'll realize that building one is a project that you could take on. Here are
the basics.
Batteries and Motors
The real magic here is the combination of
the very powerful lithium polymer (LiPo) batteries and brushless motors. These
two components, with just a normal R/C plane propeller on the motor, can lift
themselves right off the ground, and so this combination can make virtually
anything fly.
ESCs and Control Board
A multicopter's flight must be controlled
and balanced in a certain way. The motors are controlled by little units called
electronic speed controllers (ESCs), and these need signals telling them how
much power to pass on. In a multicopter, that signal comes from a
special control board. The control board is hooked up to a standard R/C plane
receiver, and possibly other peripherals such as GPS, or whatever your
imagination and wallet allow. Probably the two most popular control boards right
now are HobbyKing's Multi-Rotor Control
Board V2.1 (hobbyking.com) and Multi RC Shop's KK Plus V5.5e Multicopter
Controller (multircshop.com), both based on Atmel's ATmega168
microcontroller chip (Figure 2-5).
Arduino-oriented makers might prefer DIY Drones ArduCopter system , with its ArduPilot Mega
board based on the ATmega2560.
The KK Plus
controller
The
ArduCopter
Body and R/C Gear
The body of a multicopter can be made of almost
anything, including wood, so the only mysterious thing is the control
board. The rest is common R/C gear: a four-channel transmitter and receiver, and
connectors to hook up your components. A Google search on multicopter control
board will get you started and lead you to plenty of build instructions, and
I recommend visiting http://rcexplorer.se, http://hobbyking.com,
and http://diydrones.com.
Video from a Multicopter
Filming from the sky is the most common broken
dream among multicopter users. Unfortunately a lot of people are spending a lot
of money hoping to make great professional video from the air at a fraction of
the cost of a real helicopter. Many shops out there are ready to sell this
dream, which I think is unfair. You should think twice. Here's a test: take
your camera and put it on a broomstick. Hold the other end of the broomstick.
Now try to get good footage out of that. While it may give interesting new
angles and be 'arty' in general it's going to look "filmed from the end
of a broomstick" You'll find it hard to get the quality of shots you're
used to. The same is the case with a multicopter. You can find cool-looking
videos made from multicopters on YouTube, but they're always focused on the
flight experience ("Look, I'm flying!"), rather than a specific object or
person being photographed. If you work hard with your equipment, you can get
cool shots, but they'll be lucky shots, unless your copter can transmit video
back to the ground (see the section "Cameras and Video Downlinking"). If you get a picture
of a house, it'll be awkwardly framed. If you video anything other than random
treetops, the subject won't be well placed in the frame, and everything will
be moving about. It's not easy.
Gimbals and Gyros
You can purchase
very expensive camera mounts and gimbals with gyroscopic stabilization. But
before you do, ask to see raw film of at least one minute made with the
equipment”not filmed at high speed and slowed down for a smooth look, and not
edited in short clips, or stabilized in post-production. I
don't recommend two-axis gyro gimbals. In my experience they introduce more
shaking than they do good, even the very expensive ones. (And three-axis gimbals
introduce even more.) Since multicopters are extremely steady when it comes to
holding direction, I don't think these are of any benefit. Your best mount is
something simple like a flexible plastic tube or soft foam. Just accept that the
camera is not level at all times.
Cameras and Video Downlinking
You can get really cool
videos and pictures from multicopters if you've practiced flying, and if you
use the medium on its own terms: accept the ever-moving picture, use a
lightweight camera, and focus on action shots where the camera is moving through
the air. The best videos I've seen use extreme wide-angle shots, usually made
with the GoPro camera
brand , which can also shoot
at 60 frames per second (fps), giving a slow-motion feeling. The lighter the
camera, the better the flight performance. Think eight ounces and below. Finally, your best tool is video feedback. Actually seeing what you film, while you're
doing it, is called first-person video (FPV). There are many options for
wireless video downlinks, depending on the following parameters.
A GoPro mounting rig for a
drone
Cost, weight, and power consumption
How large an antenna can you carry to the field? What RF bands are allowed in
your country? Which are already used on your copter?
Transmitting power
Systems one watt or stronger may require a ham
operator's license. Frequency regulation information is available at http://makezine.com/go/hamradio.
Electromagnetic pulses
Powerful transmitters can
make servos and other electronics malfunction. These things have to be
experienced; there are no golden rules that I'm aware of. Sometimes things
just interfere.
In general you're looking for lighter weight, longer range, less power
consumption, and undisturbed frequencies. You can't expect to use cheap,
random TV transmission gear. Get something from a shop that has experience with
video downlinks from multicopters. And if you get a pair of video glasses for
monitoring (Figure 2-8), you can see what
the camera in the sky sees, even in sunlight. If nothing else, it's really
cool to be able to elevate your field of vision by remote control.
Video glasses for first-person
video
Going Further: Drone Multicopters
Once you've mastered R/C
multicopters, you might want to try drone multicopters. When most people say
drone they're talking about flying by GPS coordinates and
waypoints in fully autonomous mode, and that's something special. One
example is the ArduCopter, controlled by an Arduino-based autopilot developed by
DIY Drones.
Some ArduCopter
screens
There are also popular setups where cameras film the drone, and a computer
calculates its flight from what the cameras see (little dots on the copter).
Perhaps you could even set up a drone to navigate by the sun. It's all just
sensors. If you do experiment with drones, never let your autonomous machine go
beyond visual contact. Most systems I know of have a built-in maximum range of
250 meters. Once you
start playing with multicopters, you'll notice there's no longer a sharp
border between "autonomous' or "R/C" flight. Any multicopter is a robot
that to some degree is autonomously controlling its motors (or it would crash).
And even fully autonomous drones have the option of killing the automation and
returning to R/C control (anything else would be hazardous). With multicopters,
it's always some form of R/C, and it's always some kind of autonomous.
You may already have started searching for
parts only to discover that they can be found in all sorts of shapes and sizes.
The best way to categorize them is actually by prop size as follows:
Typically very small and suitable for indoor use.
They are great for practicing at home or in bad weather! These little rockets
are becoming increasingly popular and some can hit up to 100mph!
The smallest full size drone you should really be flying
outdoors. These fly very similarly to their bigger brothers and are the perfect
option for tight spaces. Check our indepth guide on micro drones.
The most common type of Racing/Freestyle Drone. Often
described as they most versatile due to the fact they offer a large amount of
power yet have incredible maneuverability and are able to carry a HD camera
such as a GoPro without a significant compromise on flight characteristics.
Ninety percent of mini quads out there at this point in time fit this category.
From various configurations you can check recommended racing drone kits that we
used and tested.
6”
Mini Class Build
A more long range and efficient option, great for
someone who would rather cruise at speed as opposed to race and perform fast
tricks such as flips and rolls. This size is often used in a long range setup
and are used to fly over scenic locations such as mountains.
At this size you start to get into the photography / videographyside of things. These drones
are big enough to carry a camera with a stabalisation system and make use of
other features such as GPS allowing them to hold their position and even return
to home automatically.
These aretypically flown in a self
leveling mode as opposed to acro mode used for the smaller
quads and have larger batteries allowing them to go much further.
Hopefully that gives you an idea of which size you
want to build.
When choosing a size please bear in mind the smaller you go the less space you have to work
with when you build. On the other hand a smaller quad is often
cheaper and the lower weight will reduce the chance of damage during a crash.
My personal recommendation for a
first drone would be a 5” as they are easy to build and have
enough power to lift a HD camera. The 5" Drone also has the most
readily available supply of parts meaning that everything is as
cheap as it can be and easy to get hold of.
Of course you don't have to just stick to one drone!
Check out Stu from UAV futures wall of quads! His YouTube channel provides
teardowns and flight videos of nearly every drone out there to help you decide.
DRONE PARTS - CHOOSING THE RIGHT COMPONENTS
So now you have a good idea what kind of drone you
would like to build the next step is to choose suitable components.
Each build is going to vary person to person but almost all builds will follow the same basic parts. For
each component I'll explained what it does, the choices you'll have to make and
the bare minimum you should look for spec wise.
Let's Dive in:
Multirotor UAV diagram by Rob Nance
frame
Frame and Propellers
This
is your starting point! This is the main body of
your build where you mount all your parts and get everything together. Frames
are normally made from carbon fiber and are
assembled with various mounting hardware such as standoffs or aluminum
sections. They can come in all kinds of shapes and sizes, we covered quadcopter frames in detailed guide.
Choices you'll have to make:
Light weight racer or
freestyler? - Racing Drones are typically minimal frames
that are light and nimble. Freestyle Drones however fly better with a little
weight as it allows them to carry momentum through various stunts. A Freestyle
drone typically requires more protection as they are often flown higher and
over harder surfaces.
Top mounted or underslung
battery? - This will affect the center of gravity but
could leave the battery more vulnerable. The closer the centre you can make it
the smoother your drone will fly.
Is there an spot to mount a HD
camera? - If you want to carry one of course! Race
drones normally opt not to due to the extra weight. For many frames 3D printed
options are available.
Do you want swappable arms or a
one piece design? Swappable arms can reduce downtime but also
increase weight.
Can I fit all of my components
in that space? Do you see space to mount all your components,
this could limit you options later down the line.
For 5"+ frame sizes you should be looking for at
least 4mm thick arms, for 3" - 4" you can go down to 3mm and for
2" just 2.5mm. Any thinner than this will break too easy.
For 5"+ frame sizes you should be looking for at
least 4mm thick arms, for 3" - 4" you can go down to 3mm and for
2" just 2.5mm. Any thinner than this will break too easy.
You may of seen frames sized by motor to motor
distance eg 220mm. The following table shows you a rough conversion of what you
should look for size wise.
Prop Size
Rough Frame Size
Min Arm Thickness
2"
95mm
2.5mm
3"
130mm
3mm
4"
180mm
3mm
5"
220mm
4mm
6"
250mm
4mm
7"
300mm+
4mm
There's a lot to consider here! If you get stuck or
are unsure have a look at pilots whose flying style you like and find out what
they are flying. Many top pilots have build videos that explain the key points
of their frames and why they choose to fly them.
Another great resource to use to help you decide on
parts is Rotor Builds. The site shows off user created Drones and includes
details such has parts lists and build guides! It's a great place to find
inspiration.
Brushless Motor
Usually a brushless electric "outrunner"
type, which is more efficient, more reliable, and quieter than a brushed motor.
Motor
These are the powerhouses that give your quad the
thrust to reach the insane speeds modern drones are
reaching. There's alot of brushless motor choices out there for mini quad, it’s
hard to decide. When choosing motors, there are specs that comes with the motor
provided by the manufacturer. You should be able to find detailed information
about the weight, thrust, power, rpm etc.
When building the drone take a closer look at this
specs in a motor:
Motor Size
The first point is the size, a motor size is typically noted in a XXYY format with the first two digits referring to
the stator diameter in mm and the second
two being the height of the magnets. Basically
the larger these numbers are, the higher torque the motor is able to produce,
think of it like engine size with the drawback of larger sizes being the
weight. In terms of performance higher torque allows the motor to hit it's
target speed faster increasing the feel and response of the drone. This could
be useful in the case of a heavier quad or when running heavy props.
KV
Another factor to consider is kv, this stands for the motors
velocity constant which means how many RPM per volt your motor
can give for example a 2300kv motor at full throttle on 10V would be spinning
at 23000rpm. Selecting the kv value is like selecting a gear in a manual
transmission. Going low gives you more torque but less top
speed and going higher will increase your top speed at the price of torque.
Generally speaking going higher requires either a big powerful motor or an
incredibly light setup. A 3" setup for example will have a much higher kv
rating when compared to a 5" design.
The following table lists some possible options for
you depending on your prop size:
Prop Size
Recommended Stator Size
Recommended Magnet Height
Recommended Motor KV
Recommended ESC Size
2"
11
03 - 06
4000 - 8000
6 - 12A
3"
13-14
06 - 07
3000 - 4000
12 - 20A
4"
13-22 (Frame Dependent)
04 - 07
2400 - 2900
20A
5"
22-23
05 - 07
2200 - 2800
20 - 35A
6"
22-23
06-08
2200 - 2800
30 - 40A
7"
300mm+
06+
1800 - 2300
30A +
When looking for a motor you should be able to find a
specification table that gives you details on thrust with different props and
amp draw which we will need to know later. Generally with a mini quad you
should be aiming for a 10-1 thrust to weight ratio. The following table is an
example from an Emax rs2205 Red Bottom motor which
in early 2016 was a top performing 5" motor. These days it has average
performance compared with the competition but would be great for a first build.
Motor Mount
Sometimes built into combination fittings with
landing struts.
Close-up of motor
mount
Electronic Speed Controller (ESC)
These small components known as electronic speed controllers are what produces the
three phase AC current needed to drive your motors. The flight controller sends
a signal to the ESC to let it know how fast it wants it to spin the motor at a
given point in time. You will need one esc for each motor, you can either
get four separate ESCs to mount them on the arms or
get an all in one board that sits inside your frame if
you have the room.
Things to Consider:
The amp Draw of your Setup! Remember those motor
tables you were looking at? You'll notice that there is an amp draw column. You
will need your ESCs burst current to exceed this value or they could burst into
flames up mid flight!
ESCs are reasonably intelligent and can run on
different software. At the time of writing you should only really consider ESCs
running BlHeli_S or KISS ESCs. The
old BlHeli or Simon Ksoftware is
now outdated.
The
ESC can talk to the flight controller through various protocols (think of them
as languages). The current standard protocol is Dshot,
if an ESC does not support Dshot 600 or greater it
is not worth considering these days.
Electronic speed controller (H) and
radio receiver (K)
Flight Controller
Interprets input from receiver, GPS module,
battery monitor, and onboard sensors. Regulates motor speeds, via ESCs, to
provide steering, as well as triggering cameras or other payloads. Controls
autopilot and other autonomous functions.
It's the brain
of drones taking into account the angle of your drone and your
control input, it calculates how fast the motors should spin and sends the
signals to the ESCs. Flight controllers are normally built for certain software
such as Betaflight, KISS or Raceflight so your software choice may effect your
decision.
The cheapest and most popular option is
currently Betaflight, KISSon
the over hand is said to be smoother but is more expensive and finally Raceflight is
a newer more cutting edge development.
Things to consider
Processor - at the heart of all flight controllers is a
micro processor that works hard to keep you in the air, we are only really
using F3 or F4 chips so I would recommend choosing a flight controller with one
of these. The F7 chip is slowly coming in however we are not really making use
of it yet. The older F1 chips present in the CC3D and NAZE 32 boards are now
outdated and will not be supported by future software updates.
All in One or Separate - Many modern flight
controllers are incorporating the PDB into the flight
controller itself! This is great for tighter builds as you only
need one board in the stack and wiring is simplified. The only negatives are
that they are normally more densely populated giving you less room to solder
wires and often require connections on both sides. The Betaflight F3 is a great example of an all in one
flight controller.
OSD (On Screen Display) - Flight controllers with
an OSD chip onboard are capable of displaying all kinds of useful information on
your video feed such as battery voltage, current draw and even an artificial
horizon. I would highly recommend an OSD however they can also be run
separately to the flight controller or onboard the PDB itself.
UART Ports - External devices are often connected to the
flight controller through UART ports. These devices include receivers, stand
alone OSDs, telemetry systems and controllable video transmitters. For a first
build you may not have to worry about these but for more feature rich drones
you will need to make sure you have enough UART ports for what you want to
achieve. I would always recommend you look at the pinout for your chosen board
to make sure that it has connections for everything you need.
Flight controller
computer
PDB - The Power Distribution Board
Your PDB takes your
battery voltage and provides various points for you to connect up all of your other electronics. Typically a
PDB will feature regulator to power your low voltage components such as the
flight controller and camera. From other things take closer look at Voltage
Requirements, Connector Locations and Maximum current draw.
Things to Consider:
Voltage Requirements -
Components such as your flight controller most often require 5V to run off,
some cameras may require 12V. If you power them directly from your battery they
will most likely burst into flames! For this reason the PDB you choose should
contain voltage regulators or BECS (battery eliminator circuits) to provide you
with the power output you need!
Connector Locations -
Your typical PDB provides connections for your battery, connections for four
ESCs and then various low voltage pads (often 5V and 12V). When planning your
build try to visualize where you want to put everything and if the pads are
actually where you want them. Some battery connectors for example stick out to
the side allowing you to directly connect an XT-60 connector. Others however
simply have two pads requiring you to run a battery wire.
Maximum
Current Draw - This is only really necessary if you have an incredibly powerful
set up drawing more current than most. The PDB will often be rated to a certain
current (typically over 100A). The same should be done on any regulators but
again will only really be necessary with elaborate more power hungry set ups
such as those running the RunCam Split
GPS Module
Often combines GPS receiver and magnetometer to
provide latitude, longitude, elevation, and compass heading from a single device.
GPS
module
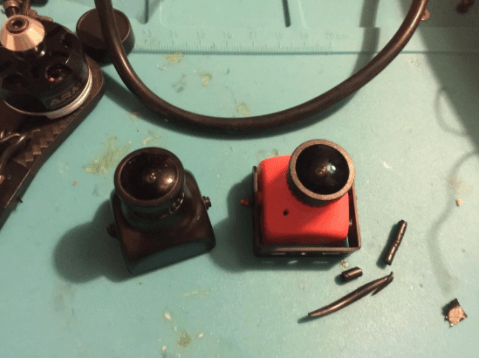
FPV Camera
This is the eye of your drone,
anything it can see you will hopefully see in your goggles! What's important
here is that we can see clearly in all light conditions and that there is no
lag in getting the image to us which could cause a crash. There a few very
similar options here which will all work great. Most cameras also come with a
load of mounts and cases to fit into any frame.
Things to consider:
Sensor Type -
FPV Cams typically have either a CMOS or CCD image sensor inside. Typically
CMOS cameras are cheaper and lighter but lack the ability to react quickly to
changes in lighting. This Is quite necessary in FPV flight as we often face the
bright sun followed by the darker ground, any lack of visibility could result
in a crash!
You can get away with flying a cheap CMOS camera
however a CCD will give you better results. Almost all CCD cameras use the Sony
Super HAD II sensor which is the gold standard in FPV drones. Examples of this
include the RunCam Swift or HS1177 variants.
There are also soe special cameras that make better
use from CMOS such as the higher resolution Monster or Eagle cameras and the
low light cameras such as the Owl or Night Wolf.
Resolution and Latency -
I've grouped these two together as they go hand in hand, the higher resolution
you run the more latency you are likely to see! Analogue cameras are rated in
TVL which is the number of horizontal lines across the screen.
Due to the added latency I would recommend sticking
with a camera the same resolution as your goggles (typically 600tvl). Another
consideration is weather you want 4:3 or 16:9 resolution with 4:3 being the
most common.
Camera Features -
Some cameras have special feature such as the ability to monitor your battery
voltage and display it on screen. Other options are low light cameras that can
see in nearly total darkness. Mini and even micro cameras are available that
may be a better choice for smaller builds whilst some cameras offer a
microphone for audio feeds.
Lens -
Different sized lenses give a different fields of view (FOV) which allow the
pilot to see more around them. The higher the field of view the more fisheye
effect you will also have to deal with.
2.8mm - The old standard, very narrow FOV
2.5mm - A great all rounder lens, same view as the GoPro!
2.1mm - A wide angle lens, this gives a great view for freestyle flying but may
be too
wide for racing.
Video Transmitter (VTX)
The video transmitter takes the signal from your
camera and sends it out through your antenna.
Things to consider:
Power Output -
Different VTX's pump out your video at different power levels. These often
range from 25mW to 800mW with some offering a means of switching power output.
Channel Options -
Most modern VTX's can run the majority of channel bands including Raceband. As
long as the VTX channel list is compatible with your receiver you should be
fine!
Signal Quality -
This one really comes down to who you'll be flying with, you'll notice that
some VTXs offer the same power and channel options yet cost up to four times as
much! The reason for this is that the cheaper VTXs spit out noise over a much
wider range than the selected channel which can lead to interference in other
pilots video feeds.
If you intend to fly on your own a cheap VTX will
work great for you however if you intend to fly in larger groups or at race
events you really need a clean transmitter like the TBS Unify Pro or the IRC
Tramp.
Switching Options -
If you do intend to fly with other people or at race events then you'll often
have to change channel to ensure everyone can get clean video. Traditionally
VTXs have a small push button you can use to cycle through video channels,
bands and power levels, the channel is then shown via a LEDs on the VTX itself.
The more race friendly transmitters actually connect
up to your flight controller and allow channel changing via an OSD or a Taranis
Transmitter. Although it sounds like a little feature it makes a huge
difference when flying in groups of over three pilots and is one I cannot go
without anymore
Be sure to check what is legal in your country! Some
VTX have limits of 25 or 200mW
Video Antennas
The best way to improve your video range or clarity
isn't necessarily increasing the VTX output power but is actually getting a
good pair of antennas. Those black dipole antennas you get with cheap goggles
or VTXs referred to as 'rubber duckies' really don't perform well and are often
binned and replaced with a high end antenna. An FPV setup requires two
antennas, one to send out the video and another to receive it.
Antenna type-
Different antenna designs have different performance, without going into too
much detail dipoles perform poorly where as circular polarized antennas perform
well. More innovative recent antennas such as TBS Triumph or Pagoda push video
range even further. A patch antenna can be used to increase range but only in
one direction and should only be used as a receiving antenna.
Connector Type -
Antennas come with two connector types SMA and RP-SMA both can talk to each
other fine but you need to make sure they match your VTX or goggles connectors.
Failing that adaptors are available.
Polarization -
The antenna itself can come in tow flavors RHCP and LHCP both work the same but
they must match in order to get a signal. By having different polarizations it
is possible to get more pilots in the air at once.
Robustness-
Obviously the antenna on the drone will be subject to a lot more abuse than the
one on your goggles! For this reason I recommend using your best/most delicate
antenna as a receiver and using a durable protected antenna on the drone.
Drone Propellers
Hopefully you've already chosen your drone size in
inches so you know your prop size! My honest recommendation for a beginner is
to get a big box of cheap props as you will break them incredibly
quickly. Props are often denoted as a AxBxC where A is the size in
inches, B is the pitch (angle of the prop) and C is the number of blades.
A 5x4x3 for example is a 5" prop with a 40
degree pitch and three blades (triblade) this may also be described as a 5040
triblade and is coincidently a great place to start when looking for a 5"
quad.
things to consider
Number of Blades-
Whilst we started using two blades we soon learnt that adding more blades
provided us with more grip and control preventing against drifting in corners.
Props come from two blades up to six blades with triblades being the most
common option. Increasing the number of blades will increase current draw, add
weight to the prop and reduce the maximum achievable top speed.
Current Draw- The
higher the pitch of the prop the faster you can go but at the same time your
motors will draw more current pushing your electronics harder and draining you
battery faster! Adding more blades is also a sure fire way to shoot up the amps
drawn. If you want to use a high pitched prop (45+) I would suggest getting
some larger motors with more torque and some higher rated ESCs. (You can
use MiniQuad Test Bench or manufacturers
specification to check these!)
Weight-
Often ignored the weight of your
Stiffness-
This is information you are only really going to find from testing props or
reading some reviews. Some props particularly the thin ones can bend when
spinning reducing their effectiveness. Ones that bend however may survive a
crash better than stiffer props that could simply snap on impact. Finding the
right prop for you can be tricky
Special Profiles -
Typically a prop has a curved airfoil surface designed to efficiently cut
through the air and provide as much lift as possible. Some props are shaped
slightly differently to modify their performance. Examples of this include:
·Bullnose
Props - A bullnose prop is effectively the width and length of a
larger prop cut down to the size it's intended for (ie 6" cut down to
5") This gives it a much wider profile with flat ends as opposed to round
tips and provides more power.
·RaceKraft
Props - Recently designed props designed by Racekraft have
a varying pitch along the length of then prop. The idea is to provide maximum
efficiency at approimately 60mph making these incredibly popular for racers and
speed addicts!
·3D
Props - 3D props are for those who want to be able to stop their
motors in mid air and reverse the direction allowing them to fly inverted for
as long as they want! Normal props are very inefficient when running in 3D mode
so 3D props are usually completely flat running at a 45 degree pitch to keep
them the same in both rotations. 3D flying is hard and not recommended for
beginners! Check out Zoe FPV on YouTube to see some of the best 3D flying
around! DJI Mavic Can't Touch My 3D Dancin'
Hopefully that gives you an idea of what to look for.
This video by Rotor Riot shows some of the
differences between the props and why pilots Chad Nowak and Mr Steele fly what
they fly.
Transmitter and Receiver
I'll tell you what almost every other website or
drone forum will tell you in terms of remotes…. If you can afford it get
an FrSky Taranis! For the money you pay the Taranis really
is an exceptional remote that can really do anything you can think of. Taranis
wise your options would be either the QX7 or X9D and their deluxe plus or
special addition variants.
Other options would be the cheaper FlySky i6,
Spectrum models or if you are a hardcore gamer the Turnigy Evolution is more of
a game controller style.
Transmitters can be a lengthy subject in themselves
so I'll just try to list a few features you should consider looking for in a
remote and reciever:
Things to consider:
Gimbals and Grip -
You probably don’t know how you'll hold your radio yet and will want to try a
few things out but basically some people prefer to use their thumbs to hold the
sticks like a PlayStation or Xbox controller whereas others prefer to pinch the
sticks between their thumb and index finger. It doesn't matter which you use
however some radios more naturally lend themselves to one of the other. Another
point is the general quality of the gimbals in the remote, high quality hall
sensor gimbals will feel a lot smother than cheaper versions.
Batteries -
Some remotes include rechargeable batteries whereas others rely on AA
batteries. I would really recommend getting a system that can be charged as
they will work out cheaper and last much longer. I had to modify my Taranis QX7
to be able to run some 18650 batteries like this:
Communications Protocol -
All radios talk to their corresponding receivers in their own language with
some communicating your stick inputs faster than others. What this means is you
will experience quicker response times and have more control over the drone.
You want to look for remotes/receivers that support either SBUS (FrSky) , IBUS
(FlySky), DSM2 and DSMX (Specktrum).
Telemetry -
The drone can actually send key information back to the remote allowing you to
know when to land and all sorts. In order to do this both the telemetry feature
needs to be on both the transmitter on receiver. Many remotes with this feature
are able to talk to you and can read out customisable warnings to tell you when
to land or when your signal is getting weak!
Receiver Options -
When choosing your remote it's worth looking at what receivers are available
for it. For example some are way to big for use in min quads however some are
too small and lack a decent range. Look for a system that supports your needs a
price point. If you do decide to go for a ready to fly drone with a receiver
make sure that it is compatible with your remote! You will typically get a
selection between FrSky, FlySky and Spectrum.
Customisation -
Most remotes allow you to configure your basic channels and even set up audio
alerts however some can offer so much more! I'm talking here about Open Tx
which is the firmware running on the Taranis's and some other radios. This
firmware is highly customisable and allows to do literally anything you can
think of. Of course for some this may not be necessary but features such as
fine turning my flight controller settings and changing my video channel
through the remote are incredibly handy!
Note that in order to use some of these features the
transmitter and receiver must support them.
Goggles
Just like transmitters goggles are a huge topic. These can become the most
expensive part of your setup with the only saving grace being the fact that you
won't crash and break them.
Check Price
Goggles often have a very high resale value if you
don't like them! I often advise people to either get their hands on a very
cheap pair with the goal of upgrading later or just go premium right form the
off. Here are some of the basic things to look at:
Box Style or Visor -
Goggles can take two forms, either the slick visor style (such as FatSharks)
that feature a small display for each eye or the larger box style goggles that
simply incorporate an LCD screen in a darkened box attached to your face. Box
goggles can be up to ten times cheaper than some FatSharks but offer reasonable
performance if you don’t mind the form factor.
Resolution -
As with most displays resolution will make the biggest difference in terms of
performance and price. Of course or FPV cameras are not HD quality themselves
however for a reasonable flight experience you should aim for no lower than
640x480 pixels. As with FPV cameras you can have 4:3 or 16:9 options and should
really match the two.
FOV -
This stands for field of view and relates to how big the image looks in your
goggles. A low FOV would be comparable to watching a TV in the distance whereas
a higher one would be like being in an Imax theatre! Of course there becomes a
point where things get too big and you need to find the sweet spot for you! I
would suggest looking along the range of 30 to 60 degrees, the following image
from Flite Test shows a comparison between some of the FatShark offerings.
Typically box goggles will give you a much higher resolution and FOV for a
lower price.
Receiver -
Some goggles come with a built in receiver whereas it will be an add on module
for others. Things to look for are features such as diversity which allow you
to use two separate antennas to maximise your signal. Other features are
channel searching and OLED displays, these features ay not be necessary for you
if you are planning to fly alone or not too far.
HDMI -
Some goggles have an HDMI input allowing you to use them to play on a simulator
or watch a movie. Look for this option if you value this feature.
DVR -
A DVR is a digital video recorder which takes your footage and saves it to a
micro SD card for you to watch later. This is useful if you don't want to carry
a HD camera however the DVR quality will be far lower than what you would expect.
Check out some of my DVR footage I took from my micro
drone that can't carry a camera: ARMATTAN BUMPER - Maiden Flight RAW!
Quadcopter Batteries
Batteries come in all shapes and sizes and it's
important to find the right ones for your build. Most frames or motors
recommend a certain battery size in their suggested parts list. When it comes
to batteries you can never have enough and I would recommend a minimum of four
for a beginner.
Typical flights last from 2.5 to 4 minutes so only
having one battery can quickly become tiresome!
Warning! Drones use LiPo (Lithium Polymer) batteries
that are extremely volatile and dangerous if used incorrectly. Be sure to learn
about battery safety before charging or using any LiPo batteries.
Things to consider:
Number of Cells -
Typically you will see battery packs described in terms of the number of cells
such as a 4 cell or just 4s. This refers to the number of cells in series with
each cell having a maximum voltage of 4.2V. The total voltage of the pack can
be found by multiplying the number of cells by 4.2 ie. 4 cells x 4.2 volts =
16.8V. The higher the voltage the more power the drone will have and the faster
it will go. Choosing a voltage higher than your components are rated for will
cause them to burn out.
Capacity -
The capacity of a cell is rated in mAh which stands for milliamp hours. This
means that a 1500mAh pack can give out 1.5A for an hours time, of course we
want to pull far more than that so will get much shorter flight times.
Increasing the pack size will give longer flight times however will add weight,
there becomes a point where the drone can't lift the extra weight of a battery.
C Rating -
The C rating is often what distinguishes a good battery from a bad one, it
refers to how quickly a battery can discharge it's energy and is often the
limiting factor in high performance drones. For example if we have a 1500mAh
battery rated at 10C that means it can give out a maximum of 15A when
discharging, 10C is relatively low and will not give enough power for most
drones of this size. I would recommend a C rating of at least 45 for most racing
or freestyle setups. Note that some companies C ratings are not accurate and
you should look at reviews to help select a battery - In general, you get what
you pay for!
Chargers
Charging your lipo batteries will require a specialist charger. They need to be charged
in such a way that their voltage is managed in order to prevent disaster.
Luckily there are a lot of intelligent lipo chargers out there that take most
of the hard work out for you with the key feature you need being balance
charging.
I would advise not getting a cheap relatively unknown
charger due to the risk of what could happen should something go wrong.
Warning! You should never charge your batteries
unattended. NEVER!
Things to Consider:
Voltage -
The important thing to make sure that the charger can handle your batteries,
this will either be listed in the cell count or voltage specification.
Max Current or Power -
This controls how fast you can charge your batteries, when charging we normally
have to select a current to charge at. For most batteries this should be at 1C
meaning a 1500mAh battery should be charged at 1.5A. Most chargers are either
rated for a maximum current (Amps) or power (Watts) which is equal to the
current multiplied by the voltage.
To sum that up a 4s (16.8V) battery with a capacity
of 1500mAh will require 16.8V x 1.5A = 25.2W to charge in one hour. If our
charger cannot deliver that kind of power than the battery will take longer to
charge. If you want to say charge four batteries at once at this rate you would
need a charger rated for at least 110W with a little headway. We can charge
similar batteries at the same time by using a parallel charging board.
Power Supply -
Electricity that comes from the sockets in your house is AC (Typically 230V AC
in Europe or 120V AC in the USA). Our chargers and most electronic devices run
on DC and require a power supply to convert this down to say 12V. Some chargers
have a power supply built in however often more expensive however some will
require an external one that you will have to source yourself. If you don't
understand this I would suggest you get a charger with a built in supply, you
can tell this by looking at the voltage input of the charger and choosing one
with a 230-120V AC input.
Parallel Charging -
Most chargers have only one output, if you want to charge more batteries you
will need a parallel charging board. I would suggest one with a built in fuse.
Warning! Parallel charging adds even more
complications and risks. Be sure you read up and understand what you are doing
before attempting to parallel charge!


 frame
frame


 Close-up of motor
mount
Close-up of motor
mount


No comments:
Post a Comment